This week I invite you to do an exercise based on the previous posts on how exposure works.
The theory I’d invite you to test is that your camera will always try to expose for middle grey unless you tell it otherwise. While these cameras are smart, they don’t always know what you are shooting. Remember, they always assume that you take photos of “average” scenes and subjects meaning that they are supposed to contain equal amounts of dark and light elements. But what if you are taking a picture of a person in front of a big white wall or suddenly someone in a dark suit decides to step into your group photo? White walls and darks suits are going to throw your light meter reading in your camera off because it can’t tell that you really want it to meter only the people’s faces. The only way to really make sure what’s most important to you in any given frame is exposed well, is to take back control of the aperture, shutter speed and ISO settings.
For this exercise, I suggest you take 4 test exposures of an ordinary object, with some light and dark values, and place it in front of a white background and then a dark background. Make sure there is a lot more background than subject. Do not use flash, so you’ll need to choose an ISO based on how much available light you have, (the higher ISO number is for less available light and visa versa). The goal will be to expose correctly for the subject.
Take one picture of your subject with the white background to start with. Try to use a camera mode where you can either adjust the shutter speed in Tv mode (while keeping the aperture constant) or adjust the exposure compensation dial (+/_) so that in effect you force the camera to overexpose, thus compensating for all the white in the background. You might take several frames to get the exposure right so that your subject is correctly exposed. (When looking in your view finder, you would see a needle that moves left and right of a center notch. Move the dial or button, depending on your camera, to the right of the center notch a couple of notches or stops. Take a picture and see if your subject looks correctly exposed.) When you get the settings right for a well exposed subject, take a photo. Then without changing anything but the background, using the same settings, take another photo with the black background. Your subject should still look good and all that changed was the background. However, you may have noticed that the needle on the exposure level would have swung over to the left of center.
Then take one picture with each background, with the camera in any of the modes, (just make sure your flash is disabled. Do not adjust the exposure, just let the camera choose the aperture, shutter speed and ISO. Watch how it tries to expose your image for an average middle grey value even if your average value might be almost white or almost black.
If this was a cooking show, this is where I’d pull the finished pies out of the oven. Below I posted the results of the exercise for you so that you can compare mine with your own results. (These images are straight out of the camera with no editing.) For my subject I set up an apple still life outside on a sunny day in the shade, so I knew I had lots of constant light and could hand hold the camera using a low ISO. I chose manual mode because I have the most control there. I set the ISO to 100 and the aperture to f3.5, so that all I was changing was the shutter speed. I found that to get the apple correctly exposed I needed a shutter speed of 1/640 of a second.

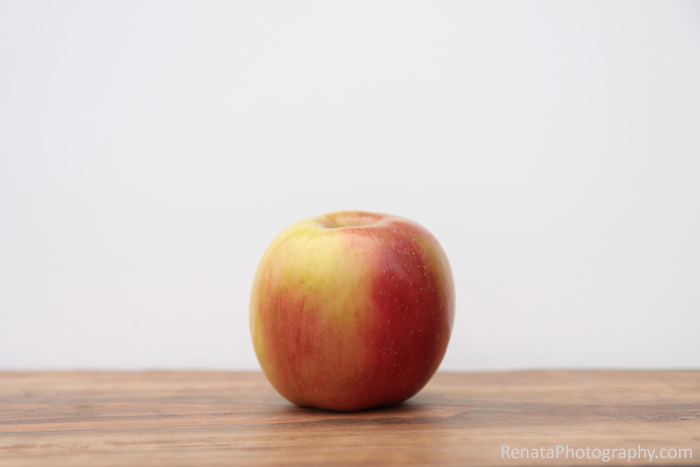
1/640 at f3.5


1/640 at f3.5
These next two frames show what the camera would have chosen in auto exposure mode.

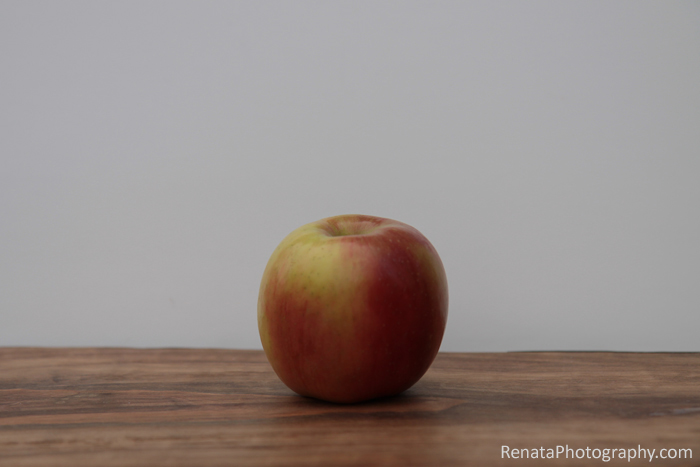
1/1600 at f3.5 Apple is Too Dark


1/320 at f3.5 Apple is Too Light
Hopefully, you can see by this exercise that you can get much more consistent results if you find the correct exposure for your subjects first and then, provided that the light remains constant, you can leave the camera in manual mode with the same settings and not worry about the light meter reading changing your settings all over the place from frame to frame. Remember, the goal is to always expose for the subject, usually faces when photographing people, then let the other values fall where they will. It will take some practice, but learning how to consistently expose correctly is critical before any creativity can really begin to take place in your photography. Hope this was helpful.

