![]()

Understanding exposure and the ability to control it is key in being able to create a good photograph. I say “create a good photograph” because you really are in charge of “creating” an image and are not just at the mercy of the camera.
I’ll discuss some basic concepts about exposure first and then help you determine what kind of various camera functions are helpful in achieving the best exposures in subsequent posts. This way, you can start building your spec sheet of what to look for when buying a new camera or read up on the one you have to see how you can make the most of it.
How many times have I heard people say this about their pictures when showing them off to friends: “Oh, this one didn’t ‘come out’ that great.” Most often this is because the image is too dark (underexposed) or too bight (overexposed).
People take for granted that the camera has a built in light meter that measures the amount of reflected light in the framed scene. The meter takes readings from the light bouncing off objects and the camera makes a calculation based on those readings telling the other settings to expose the image in a way so that it has an average light value equal to “middle grey.” Why middle grey? Because, middle grey is the average of black and white, absolute darkness and absolute light. Most cameras with built in light meters, such as a point and shoot, are set by default to always expose the whole frame of your scene to an average of middle grey because it assumes that average photos people take have about the same amount of black and white, or darkness and light in it.
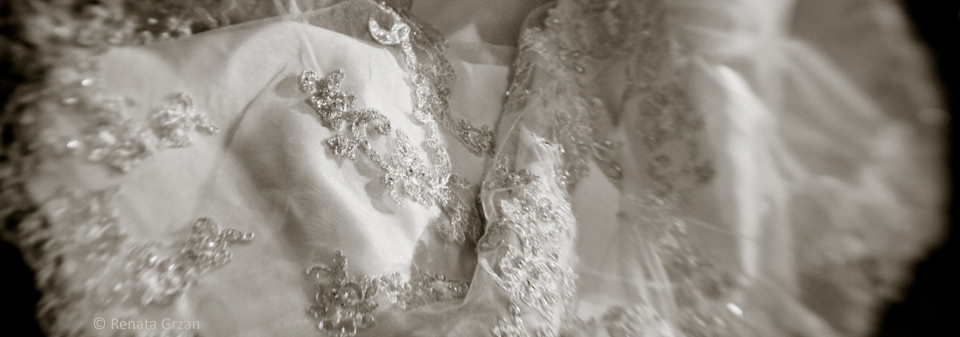
This is not a problem if you are habitually taking photos with an equal balance of light and dark. But what if you are taking photos of a white dress and that white dress fills the frame? You will mostly likely get a very grey looking dress. What if you want to take pictures of a low lit room with candle light and you want to preserve the ambiance? The camera will most likely pop the flash and put some light into your room, to push the overall light value to average middle grey. If you disable the flash, it will slow down the shutter speed (more on that next week) and then you will likely get a lighter looking, but blurry picture of your low lit room. Sound familiar?
So how do you take over and be the brains behind the camera? That depends on the kind of camera you have. Some very basic point and shoot cameras have very little, if no manual controls that let you override the default exposure metering system. One thing to look for is whether or not there is an “exposure compensation” feature on the camera. Exposure compensation tells the camera to either overexpose (make lighter) or underexpose (make darker) the overall light value from the middle grey reading the camera just took. So if you were going to take a picture of a white dress, you would want to overexpose, or turn the dial to +1 or +2 stops depending on how much brighter than middle grey you want to go. The same is true for the reverse. For that candle lit room you would want to underexpose or turn the dial to -1 or -2 stops depending on how dark you want the scene to look.
SLR cameras have an exposure compensation feature as well, but with more customization, like letting you control the stops in increments of one half or one third stop at a time. There are multiple ways an SLR meters the light, from measuring the whole frame and making an educated guess based on your focus points, this is called evaluative, to focusing on the center of the frame and on a narrow spot, called center weight and spot metering respectively. Evaluative mode is a good all purpose mode to be in if used correctly, so I suggest you keep it set to this one and I’ll be referring to this mode as your default.
Now for an experiment. Try pointing the camera at a clean white wall and take a photo in full auto mode and see if the camera darkens the image. Then point the camera at something very dark, almost black (like a dark coat or sweater) and make it fill the frame. Try and turn off the flash and see if the camera tries to lighten the image when you take the photo.
Now locate the exposure compensation feature (you might have to dig out your camera manual to locate it) and retake the same white wall at +2 stops and the dark jacket at -2 stops. Does the image brightness/darkness change and look truer to the original subject? I’ll bet it does. Try experimenting with the exposure compensation feature using the smaller increments first (+1 or -1) on some real photo worthy subjects that are not equally balanced with light and dark values and see if it helps you capture the scene more closely to the original look of your subjects. Enjoy!

I can’t wait to revisit these posts when I actually have a camera in hand! 🙂
You know, this has me thinking… I’ll try to add a line or two in my future posts when relevant for those who don’t have a camera yet or aren’t really big picture takers, but just want to sharpen their skills in “seeing” whether it’s when they are observing their environment and choosing paint colors or looking at art in a museum.
So, a great way to practice the principles from this post is to start training your eye to see the light values in an imaginary frame or a given setting. For example, try to remind yourself every now and then to look at a particular scene or subject, (especially in those moments when you think, “Oh, this would be a great picture, wish I had my camera!”), to take a few seconds and evaluate the light. Ask yourself if there is a balance of light and dark or is the light value in the scene a little more on the brighter or darker side of middle grey. Just doing this a dozen times or so will help kick start your eye to look for the light in a scene and start noticing shadows which is really important for a whole lot of things beyond just exposure, like composition and design.
You can also go to the Shutter Bee’s website where you can operate a virtual camera online. There are various scenes to demonstrate how different shutter/ aperture combinations affect the picture quality. The green arrow on the camera selects a scene, for example, ducks flying or a tourist with Greek houses in the background. Put your mouse on the aperture and then the shutter symbols and drag up or down to adjust these until the +/- meter bar on the left ends up in the middle of the scale indicating a good exposure. Then press snap to take the picture and see the result. Since it is a manual camera, you’ll have to press “again” to take another picture. Do a Google search for “shutter bee”. You may need a current version of Java for the camera to appear.
Well, that’s just the neatest little thing! Thanks Robert! I’ll be updating the TV/AV post with this; it’s a really great tool to practice the concepts with.
I googled it and here’s the link: http://www.shutterbee.thinkrandom.com/